

Framer SEO starts with checking the pages your business needs customers to find. A builder can publish a service page, but it still needs to confirm that Google can access it and that the page explains the service clearly.
For a founder or marketing owner with an AI-built Framer or Webflow site, those checks start on the published website. This guide explains what the platforms handle, what to review yourself and what need fix before launch.
TL;DR
Framer SEO is the work of making a Framer site’s pages accessible to search engines and useful to people searching for your business. Framer provides built-in tools, including an automatic sitemap and page metadata settings. Before launch, review the published home page and main service pages, then check any shared CMS templates and language versions.
- Fix access problems and broken redirects before improving search-result wording.
- Give each important page a clear purpose, supported by specific content and its own title.
- Ask for specialist help when a migration, shared template or language setup could affect several important pages.
What Framer SEO handles for you
Framer provides an automatic sitemap and controls for page metadata and heading tags. The sitemap lists page addresses for search engines.
But those features still need choices that reflect your business. A page about website migration needs different content and a different title from a page selling ongoing website support. AI-generated copy and settings should be checked against what your company actually delivers.
This review is one part of shipping an AI-built product safely. For a website, start with the pages that introduce your business and bring customers to an enquiry.
What to check on a published Framer site

Review a published Framer site by following the route from finding a page to understanding its offer. Start with the home page and main service pages. If a problem comes from a shared template, check the other pages using that template too.
Make important pages available to Google
A service page needs to be accessible to Google and allowed into its index before it can compete in search results. Framer lets you control this permission through the page’s Search engines setting. If you turn it off and republish, Framer adds a noindex instruction telling Google to leave the page out of search results. Visitors can still open the page through a direct link, but Google will exclude it after revisiting the page and reading that instruction.
Check that the setting is enabled for pages you want people to find. Publish any corrections, then use URL Inspection in Google Search Console to check the page’s indexing status. A successful live test shows that Google can access the current page for indexing; it does not guarantee that the page is indexed or will rank.
For pages that should stay out of search, such as a thank-you confirmation with no standalone value, turn Search engines off and republish. Make that decision page by page. If content must be private, use access controls; excluding it from search does not prevent someone opening its URL.
If the same content is reachable at several addresses, ask your specialist which address Google should use. A canonical tag identifies the preferred address for duplicate or very similar pages. Redirects and canonical tags help communicate that preference. Have the specialist test your custom domain and any publicly accessible platform address before recommending a change.
Submit your sitemap in Google Search Console
Framer creates a sitemap at /sitemap.xml on your published domain. Open that address and check that it lists the pages you want people to find. Select the verified property for your live domain in Google Search Console, then submit the sitemap URL through the Sitemaps report.
Check the report for processing errors. “Success” means Google fetched and read the file; it does not mean every listed page is indexed. Use URL Inspection for your priority pages to check their actual indexing status.
Give every service page a clear purpose
A service page should tell a visitor what you offer and whether the offer fits their needs. Start with the visible main heading, then read the supporting copy. Include the service’s scope, the customers or regions you serve where relevant, and evidence you can substantiate. Remove invented testimonials, client logos or results.
Start with the site-wide title and description in Site Settings. Framer uses these defaults wherever a page has no override, so replace template names and sample descriptions before publishing. The title should identify your business, and the description should explain its main offer.
Carry that purpose into the page title and meta description in the SEO settings. The title helps identify the page in search; the meta description summarises it. Use a distinct, descriptive title for each page, rather than giving every service page the title “Home”. Google can generate different title links and descriptions, so treat your settings as input to search results, not a fixed preview.
Use one clear main heading, or H1, and section headings that reflect the content beneath them. Use H2 for main sections and H3 for subsections within them. Check the assigned HTML tags, because a larger font does not make text a heading. Adjust visual size through styling.
Review meaningful images alongside the text. Alt text describes an image’s content or purpose; it should help someone understand the image, rather than repeat a list of keywords.
In Framer’s canvas, select an image and open Fill in the Styles panel to edit its alt text. For CMS images, check the description stored with each image too. Purely decorative images should have empty alt text so screen readers can skip them.
Check social sharing previews
Social preview settings control the image shown when someone shares a page on LinkedIn or in a messaging app. Check the site-wide image, then set a page-specific image where the content needs a different preview. In Framer, use Page images → Social preview and prepare a 1200 × 630 pixel image with important content away from the edges.
For CMS pages, connect the preview to the item’s image field. After publishing, check the shared URL with Framer’s Link Preview tool. Confirm that the image, title and description represent that page.
Check the content produced by CMS templates
CMS pages need metadata that reflects each item, even when they share one design. A CMS collection stores repeated content, such as blog posts or case studies. Its template determines how each item becomes a page.
Framer supports dynamic titles and descriptions drawn from CMS fields. Check that those fields contain the right information and are connected to the template. Otherwise, different items can publish with the same fallback title or description.
Open several published items and compare their content with their SEO settings. Ask your developer or SEO specialist to confirm the title and description in the published page’s code. If a shared setting is wrong, inspect all pages that inherit it; a correct sample does not prove the whole collection is correct.
Use descriptive page and CMS URLs
A URL slug is the editable part of a page’s address. Use short, descriptive words with hyphens and consistent lowercase letters for service pages and CMS items. For example, /website-migration-to-framer tells readers more than /page-3.
Choose an address that will still make sense when the page is updated. For an existing page, check the redirect section below before changing its slug.
Keep old links working after URL changes
Changing a page’s URL requires checking where its old address now leads. A redirect sends visitors from the old address to the replacement page, preserving a route from search results, bookmarks and external links.
In Framer, changing a path does not automatically update redirect settings. Open Site Settings → Hosting → Redirects and enter the old path and its replacement. For example, after moving /services to /our-services, add or update that redirect, publish the change and open /services to confirm it reaches the intended new page.
For a migration, keep a list of old URLs and their closest relevant replacements. Ask the person handling the move to test that list before switching the site over. Changing a page’s title does not, by itself, mean its URL needs to change.
Help visitors reach related pages
Internal links give visitors and search engines a route to your service pages. Link to relevant pages where the connection helps the reader. For example, a case study can link to the service used in that project. Check that the link opens the intended service page and uses wording that explains the destination.
Webflow AI checks that differ from Framer
Webflow AI sites need the same review of content and published pages, but the platform controls work differently. Use the settings for your platform rather than applying Framer instructions to Webflow.
| Task | Framer | Webflow |
|---|---|---|
| Generate a sitemap | Included automatically | Enable automatic generation, save and publish |
| Change a page URL | Review redirect settings separately | A slug change can create a redirect when the redirect option is selected |
| Set CMS titles and descriptions | Connect dynamic values to CMS fields | Define metadata from CMS fields or review AI-generated values |
Webflow’s sitemap settings, redirect option and metadata controls support these tasks. After publishing, test the result: open the sitemap, try the old URLs and inspect individual CMS pages. The presence of a control does not confirm that it has been configured for your site.
How to check a multilingual website
A multilingual website needs useful content and working page links for each audience. For an English and Dutch service page, check that both versions explain the offer clearly, including the navigation and enquiry buttons. The language switcher should take visitors to the equivalent page.
Search engines also need a way to recognise those equivalents. Hreflang annotations identify versions intended for different languages or regions. For example, the English service page can identify its Dutch equivalent, and the Dutch page must point back. Each version should list itself and the other language versions.
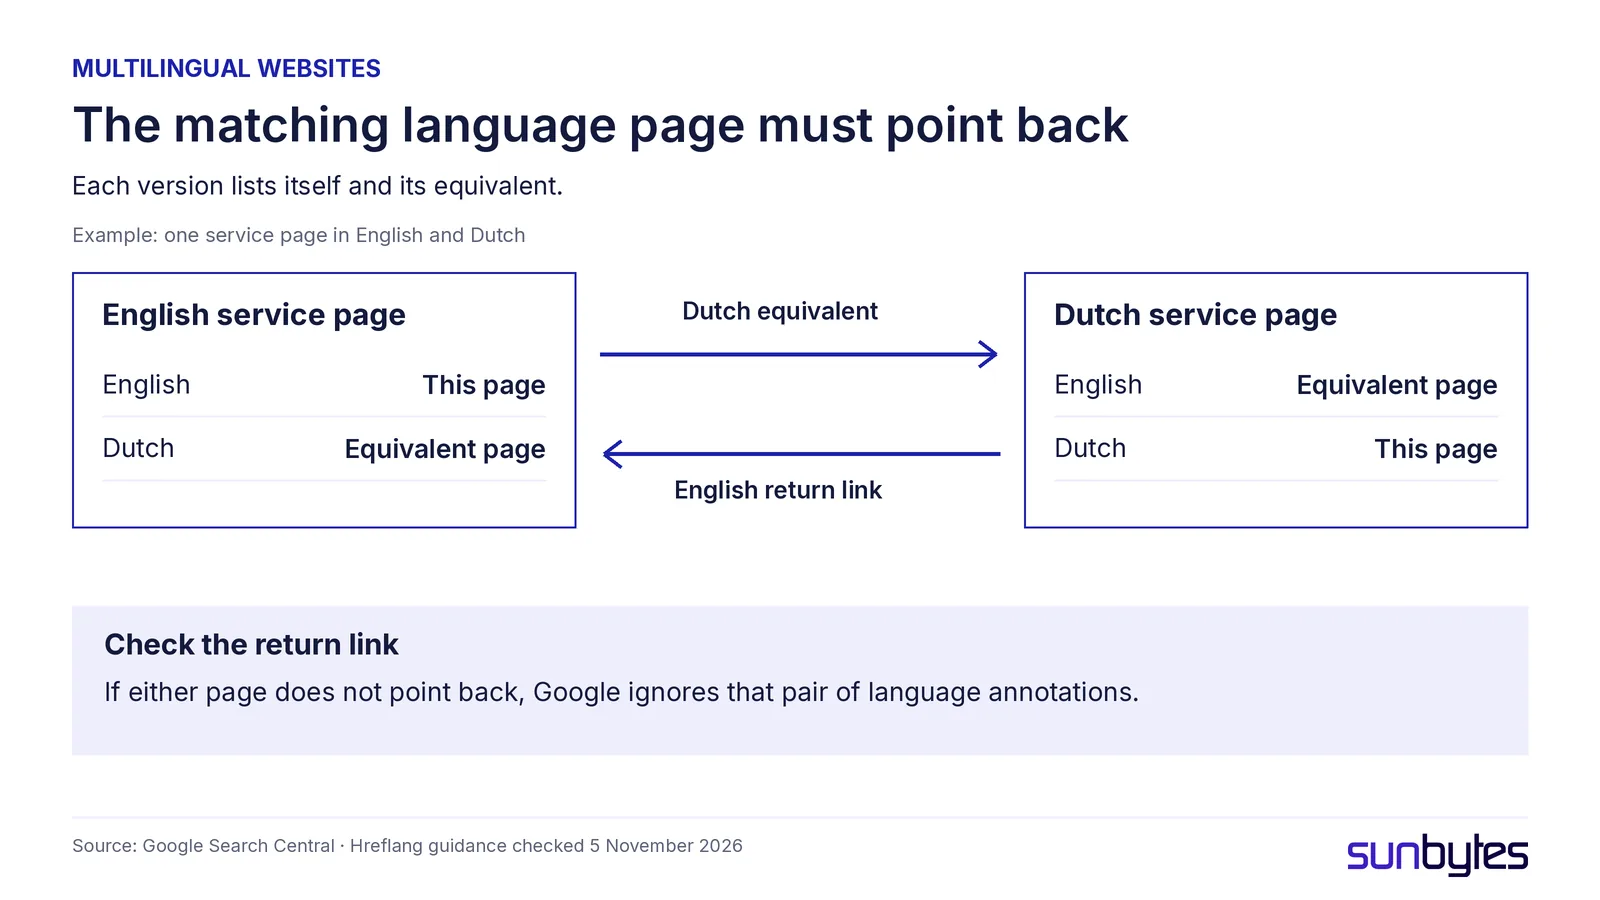
Ask your specialist to inspect the published annotations in the HTML or sitemap. Either method can be used; both are not required. Ask them to check canonical tags too, so translated pages are not all marked as duplicates of the English page. An optional x-default annotation can identify a fallback page for languages the site does not cover.
Start with the same service page in each language and a CMS page if you use translated collections. Expand the review when a template or configuration issue affects other pages.
What to fix before launch
Fix problems that block access to important pages or break existing visitor routes before polishing search-result wording. For a site replacing an existing website, redirects belong in the migration work. For a new site, check access and page content before adding further SEO features.
Once those basics work, correct shared CMS settings and language signals before publishing more pages that depend on them. Then improve titles, descriptions and supporting content, starting with the services most important to the business.
Page speed needs its own measurements. Use the website performance guide for AI-built sites to investigate slow pages. For forms, accessibility, privacy and ownership checks beyond SEO, use the wider AI-built website launch checklist.
How Sunbytes reviews the technical side of your website
Custom code and integrations add technical questions beyond page metadata. A form may need to pass information to a CRM, for example, while the website remains responsible for handling that information appropriately.
Sunbytes brings 300+ delivered projects to its AI-built product review. Software engineers and security specialists review the agreed areas across code, architecture, security, reliability and deployment. The output includes findings with evidence, a prioritised action plan and a technical handoff your team can use to plan fixes.
For a website built with AI, share the platform, custom components and behaviour you want assessed. If you need an SEO audit, state that separately when discussing the scope.